Yeah sure. If you're nice enough to give it to me, I'll take it. I will pay for shipping. I hope sending you a money order is okay?
 |
-
-
What you do is first screw that chrome mounting bracket to the outside of the A-pillar. There is a rubber gasket that goes between the bracket and the pillar. They usually come with a metal sleave that fits into the bracket. This sleave is a drill bit guide and will be discarded after you drill your hole through the A-pillar. It makes sure that you drill at the proper angle and don't chew up the inside of your bracket with the drill bit. Then, you just remove the spotlight handle, push the spotlight shaft through the bracket, and replace the handle. (the picture from Craigslist looks like that spotlight is from a '98 and up Crown vic. The shaft may me too long for your car. The proper Unity spotlight for '79-'91 will be a model "K".)Comment
-
Dam..I wanna Spotlight Now....
Comment
-
And you can still order a NEW one right from Unity Lighting.Originally posted by chitownvic View Post

You can also get Instructions and a tools and parts list as well.
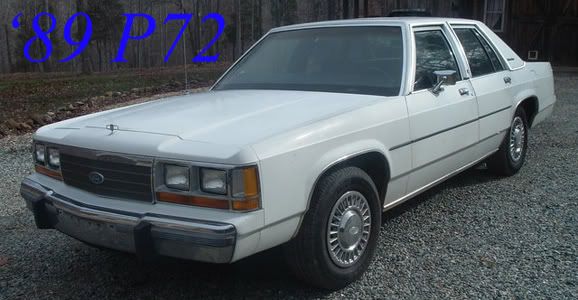
1991 LTD P72 351 W Restored Century Police (Ongoing Project) Sergeant Vic.

It's a dog eat dog world and I'm wearing milk bone underwear.Comment
-
WoW..Fawkin sweet....Thanks Watchdog...Comment
-
My handle F***ed up on mine... the handle turns but it's stripped...sigpic[LIST][*]99 Crown Vic Police Interceptor aka The Cruiser
[*]87 Chevy 20 Van 350TBI
[*]94 Mercury Grand Marquis aka Babyblue RIP
[*]83 Chrysler New Yorker 5th Ave 318 V8Comment
-
You make it sound simple. LOL. But I think I should be able too figure it out. But what if the shaft is tool long? Will it stick inside the car a litttle further? As long as I don't have to duck to get in or out I'm okay. LOLOriginally posted by neums View PostComment
-
The spotlight you are looking at is not for your car, and will not fit right... the mouniting kits are vehicle specific... if you get the wrong one, it will look like crap... the kit comes with a template to place the light on the "A" pillar right. If not, it will be crooked, or possibly be too far towards the windshiled, and you will bust the windshield when you try to drill the hole (1/2") When I get home tonight I will p/m you... There is an "Art" to getting it installed right... It is not hard.. as long as you go slow... I have gotten to the point I can install one with out the template... (I didn't have a template for my 84... since I already had the correct mounting kit...)
The one you are looking at is indeed for the newer cars.. And they mount from the inside... So the shaft goes from the inside... and are a pain to put in...
Agent Caitlin Todd� You know Tony, Statistics show that married men live longer�
Agent Tony DiNozzo� It only seems longer�.
http://www.tomspolicecars.com/Comment
-
The handle is probably not on the shaft all the way, I'll send you a PM also tonight to try to help you fix it... and adjust it right... which both will cause it to just turn and not move the spotlight...My handle F***ed up on mine... the handle turns but it's stripped...
Agent Caitlin Todd� You know Tony, Statistics show that married men live longer�
Agent Tony DiNozzo� It only seems longer�.
http://www.tomspolicecars.com/Comment
-
Oh okay. Thanks man.Comment
-
Sorry I didn't get this last night, had a fire to go to... i will get it done when I get home tonight...
Agent Caitlin Todd� You know Tony, Statistics show that married men live longer�
Agent Tony DiNozzo� It only seems longer�.
http://www.tomspolicecars.com/Comment
-
Alright. No problem. Just when ever you get a free chance.Comment
-
Spotlight installation:
First off, the installation kit for the Crown Vics for 1980 to 1991 is # 184 for the left (drivers side), 184 R for the passenger side.
The spotlight number is 340K for the six inch size bulb, 250K for the five inch size.
Tools you will need
Drill--- Preferably 1/2 inch size
Drill bit--- Long 1/2 inch at least 10-12 inches long
Drill bit--- 1/16 inch size, to drill pilot hole for the small bracket screws
Flashlight
Screw driver--- to screw in the mounting screws
Sealer--- for the mountng bracket (Black ATV)
Tape--- (preferably the "blue" easily removable tape)
Screws--- oval head #10 stainless steel
First step... mount the bracket to the "A" pillar, using two oval head STAINLESS steel screws. (About #10 size) Before you start drilling, make sure the bracket is in the right place... IF you have a new Mounting kit, there will be a sheet with 5-6 different vehicles on it. Find your vehicle and cut it out. You will be taping it to the "A" pillar so you can get the bracket in the right place. If you don't have a new bracket kit, you can go online to www.unityusa.com and download one. (I think you have to e-mail customer service, and they will e-mail you one) Once you get the template in the right place, and taped down, carefully use the punch to mark the two small holes for the bracket. (Just line up the punch, and tap it with a hammer, right thru the paper.) If you don't have a template, and can't find one on the website, you CAN do it by sight, if you are carefull. Remember, if you mess up the "A" pillar, it will be expensive to fix! I didn't have the template when I put the spotlight on in these pictures, but I have done about 200 of these over the years... (My first "install" was my 1973 Ford Pickup, in 1975...)
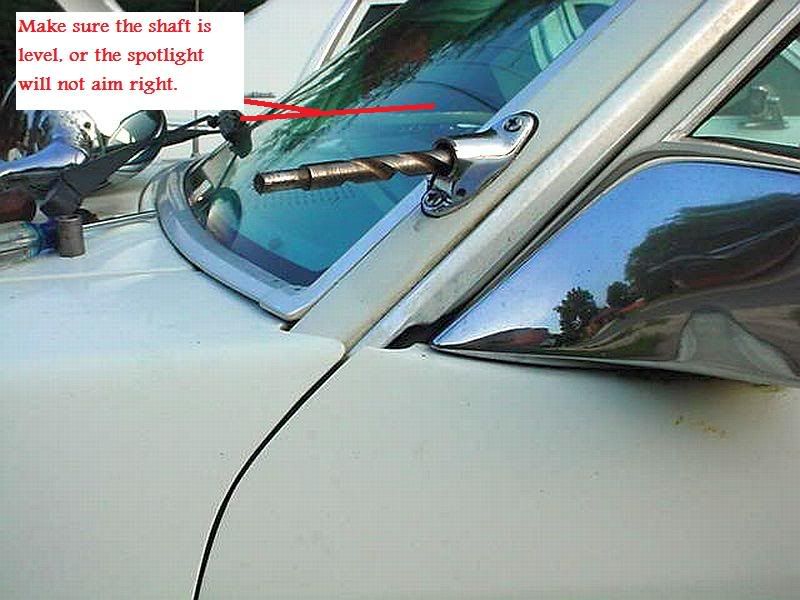
First you want to make sure the bracket is level... park the car on a level surface, put the drill bit in the bracket for a temporary "spotlight shaft" to see if it is level... use a level if you want to be excact. ALSO... MAKE SURE TO SIGHT ACROSS TO THE TOP OF THE DASH WHILE YOU LINE IT UP... YOU WANT TO MAKE SURE IT WILL CLEAR THE TOP OF THE DASH BY AT LEAST A INCH AND A HALF! If not, the shaft will not go in all the way, also if it is too close to the dash, it will bind up on the handle when you go to turn it up.
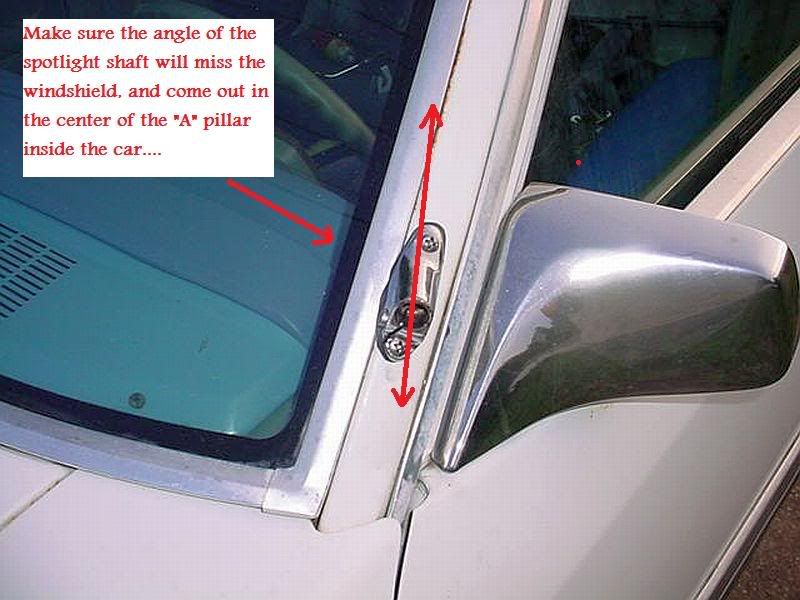
Second step is to be sure the angle is right, again sight down the "shaft" and make sure the shaft is going in the right direction. You want it to go thru the "A" pillar, and come out inside in the MIDDLE of the "A" pillar. Also check clearance between the side of the mount, and the windshield... You can move it around some,,, But be carefull...
After you get it lined up where you want it to go, mark the "A" pillar with a pencil or small tip felt pen. Make sure you didn't move it while you marked it, so line up the holes to your marks, and recheck all the clearances, for level, and angle...
After the bracket is mounted. after starting both screws, take the bracket back off, and put a light coat of the ATV on both sides of the gasket, so it will seal it from water.
Next, insert the drill collar, and tighten down the screw on the side of the bracket to hold it in place... This keeps the drill bit straight in the bracket while drilling.
Now chuck up the 1/2 inch drill bit, (I removed the drill so you can see how it should look...)
Start drilling the 1/2 inch hole for the spotlight shaft CAREFULLY... when it starts to cut the "A" pillar, it will try to bind, so go very light on drilling.... since it is going in at a very sharp angle.. the large drill bit will tend to try to bind up... just go slow, and with a very light "touch" . Once you drill thru the outside of the "A" pillar, take the drill bit out, and using the flashlight, make sure there is no wires to get in the way running down the inside of the "A" pillar... if there is, try to move them back with au un-bent coat hanger or something. If there is nothing in the way, or after you move it out of the way... Then keep drilling all the way thru the pillar... and thru the plastic trim piece. Word of caution, go VERY slow on the inside, so you don't break the inside trim piece plasic. You should be able to drill all the way thru...
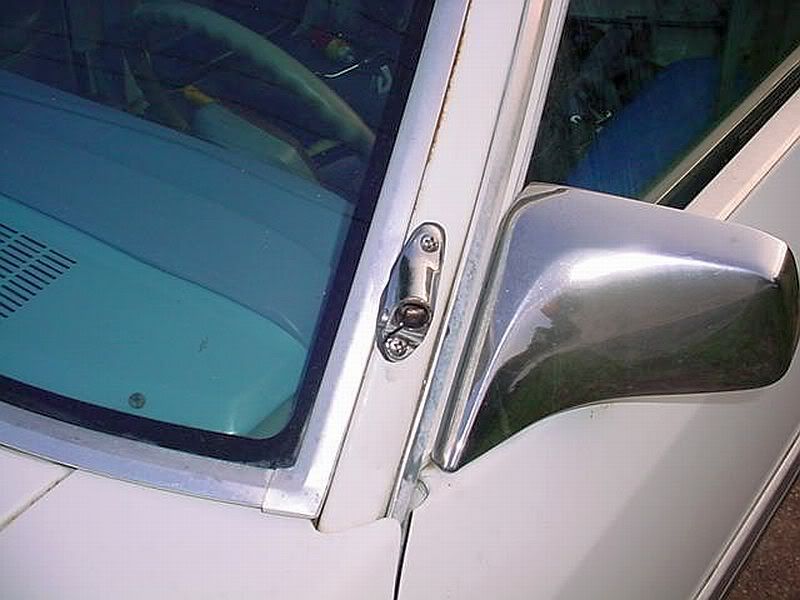
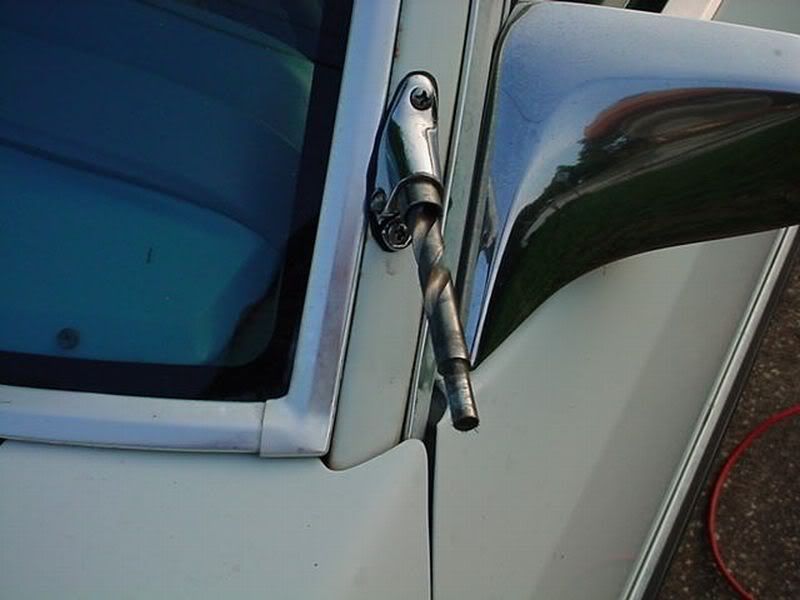
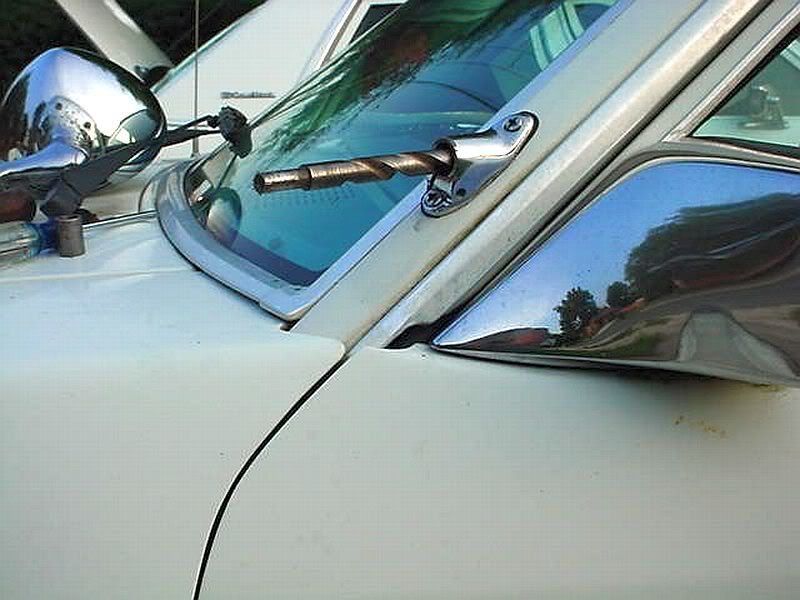
Next step is to remove the drill collar, and insert the spotlight shaft. there is a split collar of brass on the shaft, line the "split" up with the "split" on the spotlight bracket. (Line it up then slide the spotlight shaft in all the way, until it bottoms out next to the bracket. ) then tighten the screw down as tight as possible on the side of the bracket. This is what it should look like now...
After the shaft is in the car, if it feels loose, tighten the screw on the side of the spotlight head, (Arrow) until the spotlight doesn't flop around...
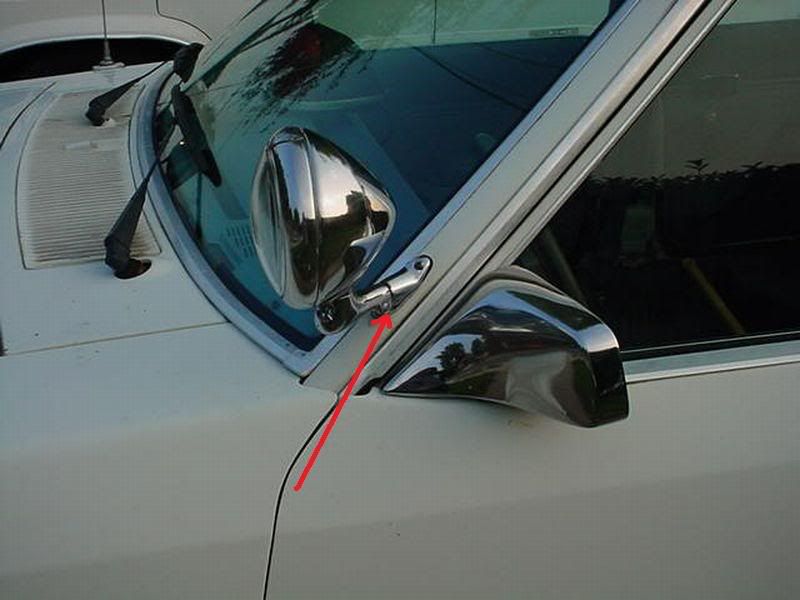
You want it where it will hold it self upright when driving... (At least 85 MPH) It doesn't take alot to get it tight, so no need to "bear down" on the screw.. snug will work fine. Remember, the outside shaft is stationary, it is not supposed to move when you turn the spotlight up or down, if it does, it is loose. The screw to tighten for the outside shaft is the one on the side of the bracket, that is miunted to thee car. The screw on the side of the spotlight head it to adjust the tightness of the movement up and down.
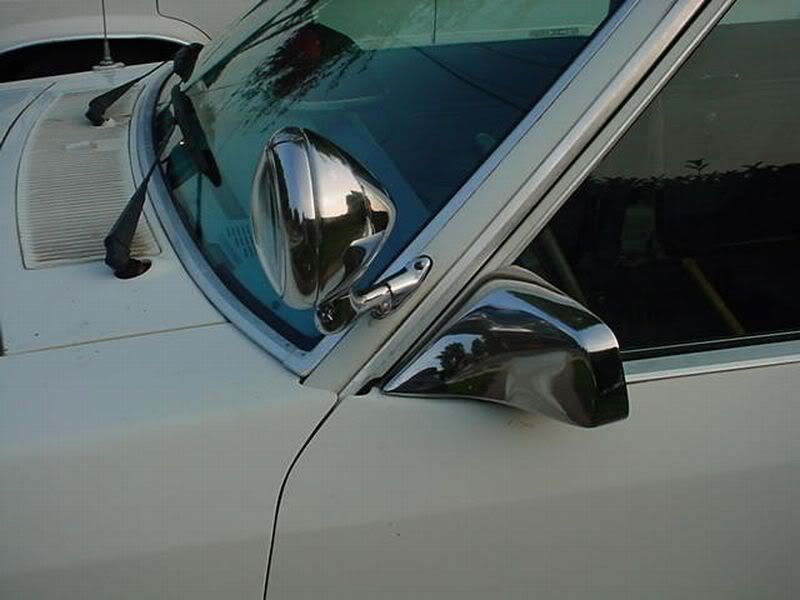
Next step is to install the spotlight handle... First, put the rubber collar over the shaft, and slide it all the way down against the inside trim piece... it has an angle cut to follow the angle of the shaft coming thru the pillar. you want the angle part against the pillar... You will see why when you install it. next comes a washer looking thing with a hook on it. This holds the spotlight wire. After that is another collar, with a small set screw. install it up against the washer and rubber grommet, and push it tight against the pillar, as this seals out drafts or any water that may get past the outside gasket. Tighten down the set screw. Next install the handle... I usually wrap the wire around the shaft a few times before running it down to the fuse block... There is a small opening under the side kick plate trim that you can run the wire thru to get it to the fuse block. Then run the wire thru the "hook" and lightly crimp the hook to hold the wire. The handle has a "key" way inside it, that must be lined up, or it will not go all the way onto the shaft... look inside the spotlight handle, and you will see it all the ways down at the bottom. turn the handle to line it up to where the key way on the shaft is, then slide the handle on to the shaft... you may have to wiggle the knob back and forth a little to get it to go into the keyway. When the shaft bottoms out, but the wedge shaped nut into the spotlight handle, (you will see one side is machined to accept this nut), then put a lock washer on the bolt, slide the bolt in the from the other way, and tighten it down. Before you tighten it down all the way, adjust the angle of the handle in relationship to the spotlight head... I like to have mine angled up against the inside of the "A" pillar when the spotlight is in the "down" position. This keeps you from "smacking" it getting in and out of the car! Believe me, it will only take once!
That handle / spotlight shaft DOES NOT MOVE!!!
Any other questions, let me know.Last edited by trwp72; 12-11-2009, 04:01 PM.
Agent Caitlin Todd� You know Tony, Statistics show that married men live longer�
Agent Tony DiNozzo� It only seems longer�.
http://www.tomspolicecars.com/Comment

Comment