Announcement

Collapse
No announcement yet.

My New 1978 Ford LTD

Collapse
X
 
  • Filter
  • Time
  • Show
Clear All
new posts

    #46
    Rear Bumper Rust Proofing

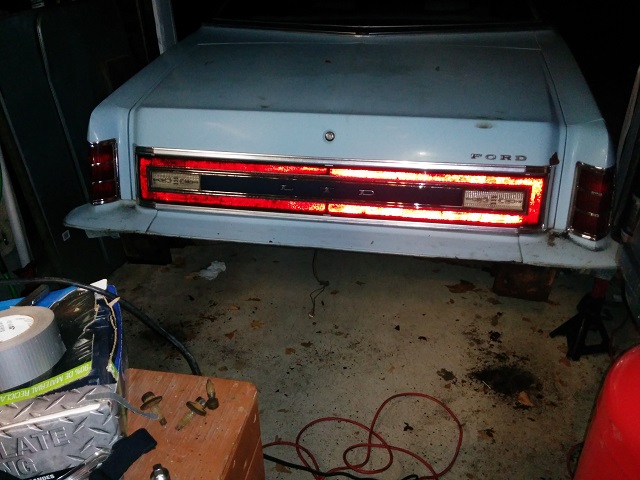
    So, I decided to dig in and try to get some serious rust proofing going on in the back of the car right off the bat as that's my biggest concern at the moment. Namely, the rear bumper, the internal bumper reinforcement, it's support isolators, and the frame they bolt to. Like I said, the car was rust proofed back in 1978 but even that wasn't enough to keep rust from creeping in. For all this work, I wore safety goggles and a painters mask for the disassemble and a full blown respirator for the rust sanding. Thank god I did because it was literally raining rust, pine needles and dirt the whole time.

    I should mention that all bolts were soaked in PB Blaster multiple times during this disassembly.

    Bumper comes off with 6 bolts on the isolators. These amazingly broke free with the impact gun. It also rained rust like you could not believe. Even with the safety glasses, I still somehow got rust particles inside the glasses.
    Click image for larger version

Name:	IMG_20160113_200730.jpg
Views:	1
Size:	108.7 KB
ID:	1278724

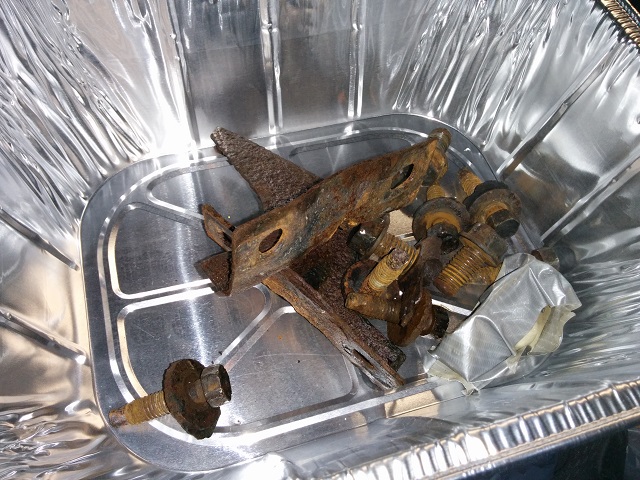
    Pile of bolts from taking the bumper off as well as those brackets that bolt on to it as well.
    Click image for larger version

Name:	IMG_20160113_211746.jpg
Views:	1
Size:	159.8 KB
ID:	1278727


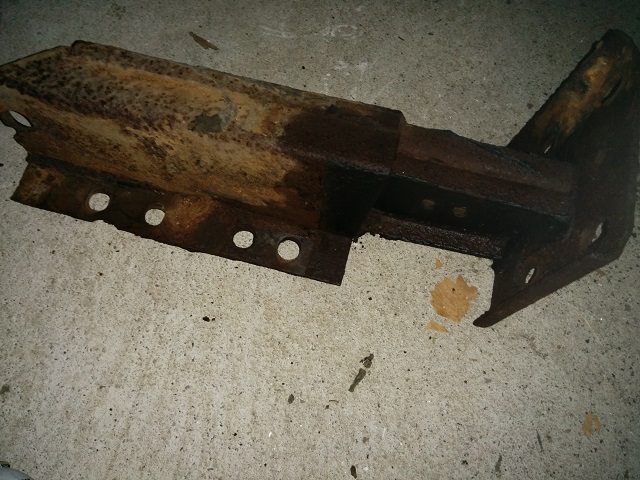
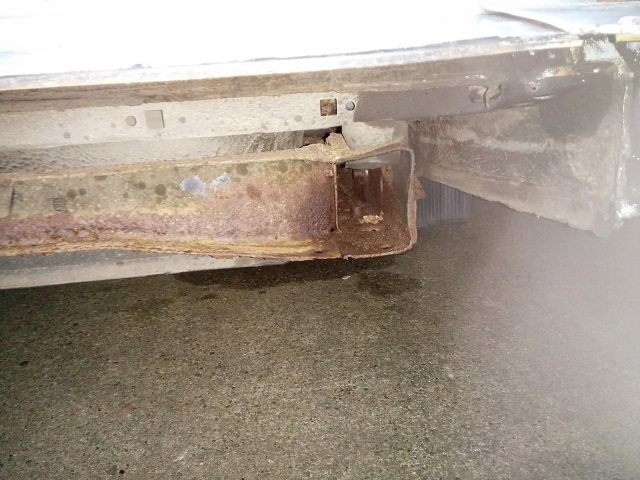
    State of the bumper isolators after the bumper came off. Not too bad... There are rust chunks stuck to them.
    Click image for larger version

Name:	IMG_20160113_200740.jpg
Views:	1
Size:	134.3 KB
ID:	1278725

    Click image for larger version

Name:	IMG_20160113_200745.jpg
Views:	1
Size:	144.3 KB
ID:	1278726


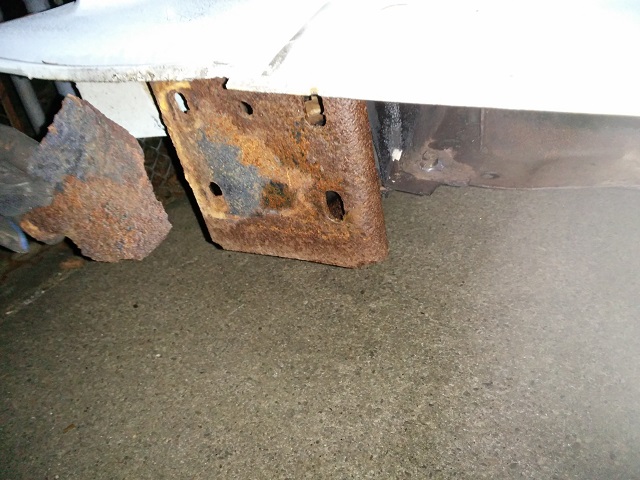
    Passenger side bumper isolator removed. Impact took it off with little effort.
    Click image for larger version

Name:	IMG_20160113_211803.jpg
Views:	1
Size:	139.1 KB
ID:	1278728

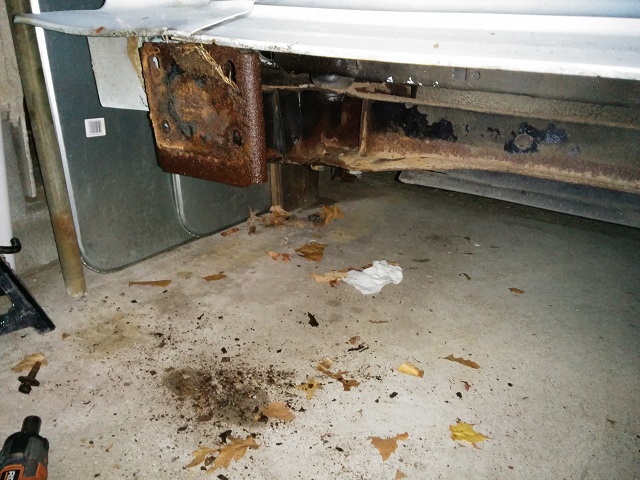
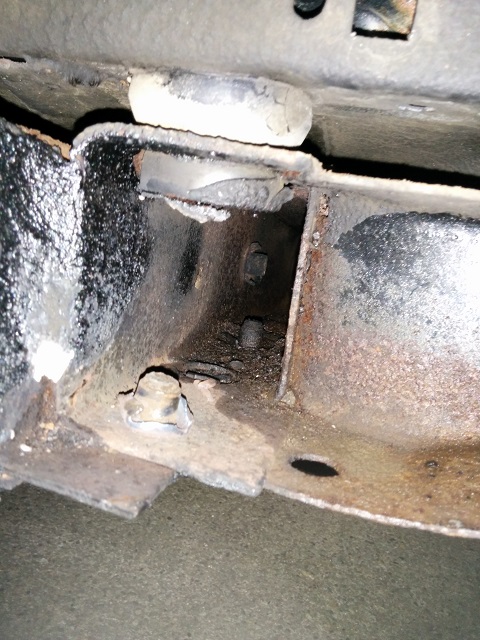
    Shot of inside the frame where it attaches.
    Click image for larger version

Name:	IMG_20160113_211820.jpg
Views:	1
Size:	119.9 KB
ID:	1278730

    The driver's side wasn't so lucky. Ford for some reason used trim nuts or something very similar in the frame to bolt these in... 38 years later this leads to spinning trim nuts in the frame and a headache.

    Here are the two nuts that will have to be cut out. Vise gripping to keep the trim nut from spinning didn't work and the second one is too far down the rail to do that with. Oh well...
    Click image for larger version

Name:	IMG_20160113_211900.jpg
Views:	1
Size:	138.1 KB
ID:	1278732

    Here's just two shots of the rust.

    This is the stuck driver's side and some big chunk of rust flake that came off being held up next to it.
    Click image for larger version

Name:	IMG_20160113_211814.jpg
Views:	1
Size:	119.2 KB
ID:	1278729

    Blurry pile of rust that rained down. This is after vacuuming up piles and piles of rust and dirt along the way...
    Click image for larger version

Name:	IMG_20160113_211829.jpg
Views:	1
Size:	87.6 KB
ID:	1278731

    '78 LTD | '87 Grand Marquis | '89 Crown Vic (RIP) | '91 Grand Marquis (RIP) | '94 Town Car (RIP) | '97 Town Car (RIP)

    Comment


      #47
      Rear Bumper Rust Proofing Continued...

      One post apparently wasn't enough due to attachment limits.

      Here's just a quick run down of the disassembly of the bumper I did in my basement.

      The hardest and most questionable bolts to get out were the ones that held the bumper reinforcement to the chrome bumper cover. They use these bolts that go through bumper reinforcement and the bumper cover that have chrome rounded tops and square sections right below that fit into a key way in the chrome bumper cover. I had one that rust made the square section of the bolt round and required a ton of PB blaster and vise grip action to get it out. Other than those four obnoxious bolts, disassembly was pretty clear cut.

      There's four of those round bolts that bolt through the reinforcement to the cover, two bolts that attach to trim bolts on the bottom lip of the bumper. There are also four bolts around the license plate bracket area. 10 bolts in all and the reinforcement comes out.

      My plans for the reinforcement is to sandblast the hell out of it and por-15 it inside and out. Chrome bumper part, I'll sand the surface rust down on the inside and por-15 that as well. All mounts will also be sandblasted and por-15'd. The bolts I'll soak in a purple cleaner and replace the bad ones. During reassembly, I'll hit them with some never seize and por-15 the exposed sections.

      All parts disassembled: I was really worried the reinforcement was going to be completely shot. Seems to be pretty solid actually. (Also, note the amount of rust, dirt and pine needles that STILL kept coming out!)
      Click image for larger version

Name:	IMG_20160114_214850.jpg
Views:	1
Size:	172.0 KB
ID:	1278733

      Chrome bumper cover inside.
      Click image for larger version

Name:	IMG_20160114_214859.jpg
Views:	1
Size:	176.8 KB
ID:	1278734

      Pile of bolts, random brackets, and vertical bump stops:
      Click image for larger version

Name:	IMG_20160114_214904.jpg
Views:	1
Size:	176.7 KB
ID:	1278735

      The rusty, but salvageable, bumper reinforcement. (Thank god)
      Click image for larger version

Name:	IMG_20160114_214910.jpg
Views:	1
Size:	171.1 KB
ID:	1278736

      Sanded down using a drill and a sanding wheel. Looks okay. There's some spots where the rust ate away a bit but hopefully after sandblasting and por-15ing, it won't rust any further. (The car isn't going to see rainy, snowy, salty roads ever again anyway)
      Click image for larger version

Name:	IMG_20160114_214920.jpg
Views:	1
Size:	170.6 KB
ID:	1278737

      '78 LTD | '87 Grand Marquis | '89 Crown Vic (RIP) | '91 Grand Marquis (RIP) | '94 Town Car (RIP) | '97 Town Car (RIP)

      Comment


        #48
        you sir are a very lucky man. very few of these cars have salvagable bumpers much less be able to remove the bolts! with mine the bumper fell off years ago and dad welded one on from a junkyard panther. straight on to the isolators, doesnt look too bad if you didnt know what to look for, but since then the isolators and frame are completely gone. when i got to fix it i got probably a good 2ft section of frame rail to replace. once its all said and done i wont have isolators. ill just have the stock bumper support welded solid to the frame.

        to answer your question im currently running a c6 i think? i always get them confused. mine is NOT the one that bolts on the big blocks. however the one i have is out of a maverick. i still have my original but it needs a rebuild and i needed one in a pinch about 5 years ago.
        Charlette - Brown 1977 Ford LTD - 351 Windsor 155K, Full Custom Pioneer system, green HID, interior & underbody
        Alesha - Black 1982 Mercury Marquis - 255ci 178K, full custom Kenwood and Infinity system, lowered, dual exhaust, LED all the things
        Tangerine Dream - Orange 1988 F-150 Custom - 300 i6 82k, Ghetto sound system, 5spd, 2WD, #farmtruck

        Comment


          #49
          Looks sharp with the new headlights. Best of luck with the old girl, I love the old barges too

          Comment


            #50
            Originally posted by slack View Post
            Thanks! I have a thing about baby blue cars... it seems they some how always seem to make it through the years and remain affordable. haha. I actually got this LTD for what I would consider dirt cheap around here. Do you have any pics of the '78 LeSabre?
            Ask and ye shall receive
            Click image for larger version

Name:	00n0n_3yIcXAfZuT7_600x450.jpg
Views:	1
Size:	41.0 KB
ID:	1278765Click image for larger version

Name:	00n0n_kAPVOrOii19_600x450.jpg
Views:	1
Size:	30.8 KB
ID:	1278766Click image for larger version

Name:	CAM00367.jpg
Views:	1
Size:	127.6 KB
ID:	1278763
            Click image for larger version

Name:	00A0A_cwe6IYwr6Qu_600x450.jpg
Views:	1
Size:	39.9 KB
ID:	1278764Click image for larger version

Name:	00V0V_hNc06S6PI1n_600x450.jpg
Views:	1
Size:	31.2 KB
ID:	1278767

            Anyplace that you see paint missing, that's now been replaced by surface rust that has spread rather impressively. Equipped with the much-derided Pontiac 301 engine, which I have to say, runs better and more smoothly than its reputation would imply.
            1987 Ford LTD Crown Victoria 2-door Coupe - perpetually "sort of" for sale...
            Black with Red cloth (velour?) interior.
            Purchased on 10/10/2008, with only 70,386 original miles, and only ONE previous owner.
            Reader's Ride post, First pic with "new" rims, Other pics with "new" rims

            Comment


              #51
              Originally posted by marquis_82_withneons View Post
              you sir are a very lucky man. very few of these cars have salvagable bumpers much less be able to remove the bolts! with mine the bumper fell off years ago and dad welded one on from a junkyard panther. straight on to the isolators, doesnt look too bad if you didnt know what to look for, but since then the isolators and frame are completely gone. when i got to fix it i got probably a good 2ft section of frame rail to replace. once its all said and done i wont have isolators. ill just have the stock bumper support welded solid to the frame.

              to answer your question im currently running a c6 i think? i always get them confused. mine is NOT the one that bolts on the big blocks. however the one i have is out of a maverick. i still have my original but it needs a rebuild and i needed one in a pinch about 5 years ago.
              Yeah. The rear bumper assembly was the first thing I looked at when I went to look at the car. So many I've seen pop up that are all about to fall off or are already removed. 2ft of frame is an impressive amount of rot. Do you pass inspection with that? Here in NY, there's no smog for that old but frame rot would make you fail safety. I think at that point, after you got it fixed you would have to get a rebuilt title or something.

              Originally posted by farm View Post
              Looks sharp with the new headlights. Best of luck with the old girl, I love the old barges too
              Thanks!

              Originally posted by King_V View Post
              Ask and ye shall receive
              [ATTACH=CONFIG]44356[/ATTACH][ATTACH=CONFIG]44357[/ATTACH][ATTACH=CONFIG]44354[/ATTACH]
              [ATTACH=CONFIG]44355[/ATTACH][ATTACH=CONFIG]44358[/ATTACH]

              Anyplace that you see paint missing, that's now been replaced by surface rust that has spread rather impressively. Equipped with the much-derided Pontiac 301 engine, which I have to say, runs better and more smoothly than its reputation would imply.
              Nice car! I don't think I've seen one of these around by me since some kid had one when I was in highschool 10+ years ago!

              '78 LTD | '87 Grand Marquis | '89 Crown Vic (RIP) | '91 Grand Marquis (RIP) | '94 Town Car (RIP) | '97 Town Car (RIP)

              Comment


                #52
                Painting / Rust Proofing

                It was finally warm enough earlier this week to get some painting done.

                I gave my new front calipers a few fresh coats of high temp paint in the basement. Lesson learned from this: Even with an open window it made the house reek of paint. Next time I'll do it in the garage. There was a ton of particles in the air from the spray paint. Thank god for respirators.

                Click image for larger version

Name:	IMG_20160127_154405.jpg
Views:	1
Size:	125.2 KB
ID:	1278913

                Last weekend I cut out the bolts that were stuck holding the other bumper isolator on so I was able to prep that to be painted.

                Wednesday I started POR-15ing the rear bumper parts that I prepped. Didn't come out too bad. I still have to do the whole big insert and the back of the bumper itself. That's probably going to use a decent amount of paint.
                Click image for larger version

Name:	IMG_20160203_173238.jpg
Views:	1
Size:	150.8 KB
ID:	1278914

                '78 LTD | '87 Grand Marquis | '89 Crown Vic (RIP) | '91 Grand Marquis (RIP) | '94 Town Car (RIP) | '97 Town Car (RIP)

                Comment


                  #53
                  Good preventative maintenance! I did the same on my '82 LTD. it's like they never painted that stuff from the factory.
                  1990 Country Squire - weekend cruiser, next project
                  1988 Crown Vic LTD Wagon - waiting in the wings

                  GMN Box Panther History
                  Box Panther Horsepower and Torque Ratings
                  Box Panther Production Numbers

                  Comment


                    #54
                    Tune up, New Master Cylinder, Brake Line Leak Found

                    Sorry for the lack of updates... work has been busy and the weather actually being cold for a bit slowed down some painting.

                    A week ago I put the bumper back together and reinstalled it on the car... I forgot to take pics, but I guess I can do that whenever. I coated everything I could on the frame with POR-15 as well as the internals of the bumper. I also picked up the Eastwood frame coating paint which has a cool 360 degree spray tube that goes on the rattle can that you can snake into hard to reach places. I used this on the inside of the bumper reinforcement as well as the bumper absorbers where I couldn't get the brush with POR-15. I also made sure the coat the inside of the frame up and down the car. I still have some more to do.. so far I've used four cans. (About 3 of them went to just the rear bumper assembly and immediate mounting location). I'll try to get some pics of the final product. It looks pretty good under there. I also made sure to cover every bolt with anti-seize as well as replaced a few that were no good.

                    A bumper mounting tip if anyone ever reads this that is in the process of remounting a rear bumper on these cars:
                    Snaking that "L" bracket inside the reinforcement that the absorbers bolt to is IMPOSSIBLE with your hand while the bumper is lined up to be mounted on the car. You can snake your hand in there when the bumper is off the car though. (I'm sure there's some random Ford specialty tool that's used in this one instance that holds the thing in place so you can start threading the bolts.)

                    What I had to do, which may or may not work for everyone, is I lined the "L" bracket up with the guide holes (there's two other holes besides bolt holes) and put a little Gorilla Glue on there to hold it in place. I made sure that the L bracket was completely tightened down with the mounting bolts (off the car) before putting the glue on to secure it. Then, the next day, I lined the bumper up and was able to thread the bolts. I say this might not work because if your absorber mount points no longer match up to the initial location, your bolt holes won't line up enough to get all the bolts in there. Also, you may want to use something weaker than Gorilla Glue.. that stuff is strong as hell and if you have to get the alignment better after the bolts are started... you're limited in mobility with the glue holding that bracket in an absolute location.

                    About two weeks ago I also did a quick tune up. I did cap, rotor, wires, plugs, stopped off any open vacuum lines and tightened the belts. Everything on this engine was original when I bought it. What a difference that made. The car no longer stalls out when stopped in drive and runs much, much smoother. Who would have thought swapping out almost 40 year old parts would help?

                    Things actually didn't really look too bad except for the distributor cap being worn down:
                    Click image for larger version

Name:	IMG_20160306_152956.jpg
Views:	1
Size:	114.6 KB
ID:	1279080

                    Click image for larger version

Name:	IMG_20160306_152948.jpg
Views:	1
Size:	131.7 KB
ID:	1279079

                    Click image for larger version

Name:	IMG_20160306_160217.jpg
Views:	1
Size:	225.6 KB
ID:	1279081

                    Today I swapped out the old master cylinder because the original one was leaking internally and, after I removed it, I saw it was leaking a little in the back as well. To my amazement, the brake lines and mounting bolts came off without any cursing or persuasion. After bench bleeding the new master, installation was a breeze.

                    Old master:
                    Click image for larger version

Name:	IMG_20160320_183033.jpg
Views:	1
Size:	152.8 KB
ID:	1279082

                    New master installed looking nice:
                    Click image for larger version

Name:	IMG_20160320_183018.jpg
Views:	1
Size:	92.1 KB
ID:	1279083

                    Click image for larger version

Name:	IMG_20160320_183023.jpg
Views:	1
Size:	77.2 KB
ID:	1279084

                    Now that I had a working master cylinder, I went to hunt down the rear brake line leak that I was told about but couldn't find. (Never saw any fluid go down or leak anywhere but put your foot on the brake pedal and you could still spin the rear wheels by hand... not to mention the brake light on the dash). I was starting to think it was the rear wheel cylinders were just busted and leaking.

                    Nope! I hit the brakes and a nice gush of brake fluid came spraying out right on the frame rail under the driver's seat.
                    Click image for larger version

Name:	IMG_20160320_185740.jpg
Views:	1
Size:	115.2 KB
ID:	1279085

                    Shot from under the car:
                    Click image for larger version

Name:	IMG_20160320_185138.jpg
Views:	1
Size:	121.4 KB
ID:	1279086

                    So the good news is I found the leak and it's in a straight spot in the line so it should be easy to patch. The dilemma I'm having now is do I just run all new lines down the back of the car? I'm leaning towards this because the brake line connector to the rear from the proportioning valve looks pretty clean and may come off without a fight. If I take the line off there, all fittings and lines will be new to all the new rear brake hardware I've got ready to go in the car but will take longer. To patch the straight part, I could do that in an afternoon but who knows when another section will fail. (Even though it's pretty clean down there...)

                    Anyway... I've babble more than enough that I doubt many are even reading this far down so I'll leave it here.

                    '78 LTD | '87 Grand Marquis | '89 Crown Vic (RIP) | '91 Grand Marquis (RIP) | '94 Town Car (RIP) | '97 Town Car (RIP)

                    Comment


                      #55
                      Replace all lines. Car is old. Do it all now and be done with it.

                      For the bumper there should be a thin washer that slides/forced over the studs and holds the L bracket in place.
                      ~David~

                      My 1987 Crown Victoria Coupe: The Brown Blob
                      My 2004 Mercedes Benz E320:The Benz

                      Originally posted by ootdega
                      My life is a long series of "nevermind" and "I guess not."

                      Originally posted by DerekTheGreat
                      But, that's just coming from me, this site's biggest pessimist. Best of luck

                      Originally posted by gadget73
                      my car starts and it has AC. Yours doesn't start and it has no AC. Seems obvious to me.


                      Comment


                        #56
                        Thanks. Yeah, you're right. I'll replace the lines. There's really no crazy bend so it shouldn't be so bad.

                        As for the washer, that makes sense. The rust gods must have eaten mine already.


                        Sent from my Nexus 5 using Tapatalk

                        '78 LTD | '87 Grand Marquis | '89 Crown Vic (RIP) | '91 Grand Marquis (RIP) | '94 Town Car (RIP) | '97 Town Car (RIP)

                        Comment


                          #57
                          Just a quick update, no pics.

                          I started replacing the brake lines to the rear and I can't believe it but the rear brake line actually unscrewed from the proportioning valve and the fitting over the rear diff. That's some luck I never thought I would have had!

                          '78 LTD | '87 Grand Marquis | '89 Crown Vic (RIP) | '91 Grand Marquis (RIP) | '94 Town Car (RIP) | '97 Town Car (RIP)

                          Comment


                            #58
                            Fantastic find on this car mang! I am so glad to see another one of these under-appreciated gems kept on the road!
                            Back in the saddle again!

                            2004 Crown Victoria Police Interceptor in Unimaginative Bureaucratic Brown
                            Bone stock... for now.

                            Comment


                              #59
                              Thanks! It's got a long way to go to be pretty but then again, that's half the fun.

                              I have more updates on the rear brakes that I've been working on and I'll probably post that up later tonight or tomorrow when I have time to sort out the pics.

                              '78 LTD | '87 Grand Marquis | '89 Crown Vic (RIP) | '91 Grand Marquis (RIP) | '94 Town Car (RIP) | '97 Town Car (RIP)

                              Comment


                                #60
                                Brake line fixed and new rear brakes

                                Brakes, brakes, brakes.

                                So I ended up having some of the correct size brake line laying around and was able to fix that quiet easily. I've never been really good at flaring lines but I think something "clicked" and I had no issues flaring the lines this time. I had them looking nice on the first try. All patched up and no leaks.
                                Click image for larger version

Name:	IMG_20160407_190850.jpg
Views:	1
Size:	80.9 KB
ID:	1279963

                                After I fixed the lines, I moved on to new shoes and wheel cylinders in the back. I wanted to get new drums but apparently they don't make them anymore and I can't find them anywhere. That's okay for now. These drums still look pretty good.

                                What I did find interesting is that there were these washers on the studs to keep the drum pressed on. I'm guessing that's OEM from Ford and the drums have never been removed. They were sort of a pain to remove and were broken in the process.
                                Click image for larger version

Name:	IMG_20160410_145251.jpg
Views:	1
Size:	168.3 KB
ID:	1279964

                                After I got the first drum off I was surprised at how much meat was still on the rear shoes. Everything looked pretty good just covered in surface rust.
                                Click image for larger version

Name:	IMG_20160410_154010.jpg
Views:	1
Size:	134.4 KB
ID:	1279966 Click image for larger version

Name:	IMG_20160410_150841.jpg
Views:	1
Size:	174.0 KB
ID:	1279965

                                Everything removed:
                                Click image for larger version

Name:	IMG_20160410_154003.jpg
Views:	1
Size:	176.1 KB
ID:	1279967

                                The wheel cylinders weren't leaking but I had them and the ones in the car are pushing 40 years old so I swapped them out anyway.
                                Click image for larger version

Name:	IMG_20160410_154007.jpg
Views:	1
Size:	222.1 KB
ID:	1279968

                                After before everything was put back together, it was hit with a liberal dose of Brak Kleen and a tiny bit of anti-seize on the backing plate contact spots and on the automatic adjuster to help prevent against any binding.

                                All new hardware and everything back together:
                                Click image for larger version

Name:	IMG_20160411_173940.jpg
Views:	1
Size:	175.2 KB
ID:	1279969

                                The passenger's side wasn't so friendly. I beat the crap out of it with a mini sledge hammer and it still wouldn't come off... (Continued in next post)

                                '78 LTD | '87 Grand Marquis | '89 Crown Vic (RIP) | '91 Grand Marquis (RIP) | '94 Town Car (RIP) | '97 Town Car (RIP)

                                Comment

                                Working...
                                X