Announcement

Collapse
No announcement yet.

Those who have done BODY WORK and REPAIR ...

Collapse
X
 
  • Filter
  • Time
  • Show
Clear All
new posts

    Those who have done BODY WORK and REPAIR ...

    This thread is for gathering information from our members (experts and novices alike). This will eventually become an archived reference article. The main purpose of this project is to provide a reference source for those who want to be more informed and prepared before tackling body work or body repairs.

    Tell us about your experience(s) with body work and body repairs (big or small). Give details as to what tools/equipment you used, tool/equipment brands, techniques when using repair tools/equipment, and how it turned out. Post pictures, if you have them.

    Rules:
    -Do not post about priming, painting, or air brushing. This is body work and body repair ONLY.
    -Keep to the point. NO EXTRA BS or THREAD-JACKING!
    -Tech related questions are allowed if they relate directly to body work/body repair or to a prior post in this thread.
    -No posts like "Hey, your car looks awesome" allowed.
    -Any posts that can't follow the first four rules will be removed or edited.
    Last edited by monterey1962; 04-04-2010, 01:38 PM.

    #2
    Ive repaired some deep cracks in my header panel by using fiberglass body filler and a hack saw. (No pictures sorry) This crack went completely through the top of my header panel, right where the hood ornament goes. So I taped off the holes for the header panel, took a hacksaw with a good blade, and cut the crack larger to actually stop the cracking. The same could be achieved by drilling holes along the crack. I then applied the fiberglass body filler. It was long hair tiger hair or something (probably not tiger) but anyway, mixed it with some hardener, and applied it around the area with an body filler applicator. After allowing some time to dry (drying time varies to some factors such as; amount of hardener added to the filler and climate), I took 80 grit sand paper and took the filler close to what the header panels thickness was. Then with some finer sand paper. I started with 100 grit and worked my way up to a 180. I did this with a v type pattern, to make a crosshatch almost. This helps reduce the amounts of scratches found in the filler after sanding. And by transitioning from a coarse grit to a finer grit sand paper, the scratches for the most part were completely removed, and was smoother and a better paintable surface. Unlike plastic body filler, this type of filler does not absorb water, so it's possible to drive around with it unpainted without any negative results later on. This is probably a more costly filler to buy, but it works great.

    Comment


      #3
      Completely retarded question but somewhat related: Wet sandpaper is good for what? I see it mentioned often being used in body work and repair but I don't know at what stage of the game.


      related to vickys post: Fiberglass body fill is superior?


      I am going to use this thread to tackle my own body work this summer, I think. Can I keep posting questions like this here? There will likely be many.
      Last edited by 1990LTD; 04-04-2010, 12:54 PM.
      sigpic


      - 1990 Ford LTD Crown Victoria P72 - the street boat - 5.0 liter EFI - Ported HO intake/TB, 90 TC shroud/overflow, Aero airbox/zip tube, Cobra camshaft, 19lb injectors, dual exhaust w/ Magnaflows, Cat/Smog & AC delete, 3G alternator, MOOG chassis parts & KYB cop shocks, 215/70r/15s on 95-97 Merc rims

      - 2007 Ford Escape XLT - soccer mom lifted station wagon - 3.0 Duratec, auto, rear converter delete w/ Magnaflow dual exhaust

      - 2008 Mercury Grand Marquis Ultimate Edition - Daily driver - 4.6 2 valve Mod motor, 4R75E, 2.73s. Bone stock

      Comment


        #4
        FIBERGLASS BODY FILLER:

        Fiberglass body filler is stronger (structurally) than plastic body filler and is waterproof, however it is very difficult to get as smooth as plastic filler. Usually one would use the fiberglass filler, sand it to shape, and then smooth it out with plastic filler.


        WET SANDING:

        Wet sanding is accomplished by soaking pieces of sandpaper in water and spraying the surface with water periodically with water. An old Windex bottle full of water and WetOrDry sandpaper does the job fine. The wetter you keep the surface, the less the paper will clog, the longer the paper will last, and the more efficiently it'll cut. Water is used to lubricate the sandpaper so that less sand scratches appear in the finished product.

        Wet sanding is used to sand primer smooth prior to a basecoat, in order to produce as smooth a paint job as possible. It's very labor intensive and time consuming, which is why it's only done in higher end paint jobs. A typical collision shop doesn't do any of it. Wet primer sanding is usually done with 320 or 400 grit. The advantage over dry sanding is that you can use a lower grit, and it completely eliminates dust. However, if left to dry without completely rinsing the area, a primer-mud will start to cake up and can be annoying to have to clean out of tighter areas. With dry sanding, you can just use compressed air to blow all the dust out of those areas. This is really personal preference. I've done both depending on the environment and particular job.

        It's also done to sand smooth a finished clearcoat. Again, because of how time consuming it is, it's only done on higher end paint jobs. What grits are used is dependent on how rough the finished paint is (how much cutting needs to be done) and personal preference. I usually start with 1200 and then move up to 1500, and if the job is really fucking fancy then you could even do 2000 if you wanted.

        You can do both these jobs with dry sanding too, but you have to use a much higher grit to accomplish the same results. Instead of sanding primer with 320 or 400, you use 600. Instead of starting with 1200 on clearcoat, you start with 1500 or 2000. I've never dry sanded clearcoat, nor do I know anyone who prefers it over wet.
        Last edited by CheeseSteakJim; 04-04-2010, 01:07 PM.

        Comment


          #5
          Originally posted by 1990LTD View Post
          I am going to use this thread to tackle my own body work this summer, I think. Can I keep posting questions like this here? There will likely be many.
          Yes, it will help bring out good information from others. I may have to tweak the rules a bit, but they are there because some people can't understand how to post tech questions/answers in tech threads.

          Comment


            #6
            Ive done the wet sanding above, no need to explain that again. Ive also done some additive metal work with rivets on my rear quarters, and used body filler. I wet sanded my whole car to prep for paint with 300 grit to scuff the clear. there is quite a lot of bondo on my car, although ill be damned if you can point out were it is. I used red putty over the filler and wet sanded this, then use some prepsol or windex (something wet) to check and make sure all the areas are flat, if they look to be, primer and then check again. I would rather re primer than have it come back from paint looking like crater city. I will try to snap some shots of areas I did the work. Also I sand blasted the whole lower part of the car to prep for body work, and get rid of the rust. This process is pretty straight forward (point and shoot) the hard part is to not go through in some sketchy areas with a lot of rust, although sometimes you have to.
            "Shakedown"- 1991 Grand Marquis GS Dual exhaust, Magnaflow xl turbos, Rear anti sway bar, Outlaw 1 wheels, 43k miles
            1985 GMC 1500

            Comment


              #7
              A few bits of general advice:

              final sanding of body filler should be with 320 grit at the coarsest or it WILL show through all but the highest build (thickest in terms of depth of the paint on the car) primers.


              Prep work is the key. Everything gets multiplied. A 1/4 inch of surface rust left when painting will quickly be a 1 inch spot of filler lifting. A barely-visible wave in filler will "look like it's waving at you", to borrow my shop teacher's phrase, when painted.


              Use your hands or a guide coat, NOT your eyes to judge your work. The only time your eyes will give you an accurate idea of the job you've done is when you've already got paint on it, which is too late.


              If you don't have actual guide coat paint, a very light coat of any fast-drying paint that is compatible with filler but contrasts well visuall (black paint on white, blue on red, etc.) works almost as well. Just spray enough of a coat to tint the whole area, sand a few strokes over the whole surface, and the spots that are still painted are low spots.

              Don't trust plastic body filler/bondo to fill holes. Fiberglass is FAR superior at this, and metal is what you really want. Show me a hole filled with plastic filler and I'll show you a hole easily re-opened with a screwdriver or a few years of driving. All plastic fillers are designed to do is sit in little dimples and depressions and not fall off when you hit a bump. If you ask it to do anything structural, anti-rust, or anything else, it will fail.


              If you can afford it, go to the nicer fillers. The name brand Bondo is pretty near the bottom of the food chain. I've used it a few times, and there's a big difference in the results AND the ease of application and sanding compared to higher end brands. When in doubt: you get what you pay for and ask an expert.


              Metalcoat and other metal-reinforced fillers are great. A bit harder to sand than plastic fillers, but suitable for filling SMALL holes and just generally being a bit tougher and harder to crack than plastic fillers.

              Don't forget to coat the BACK of your work with por15, undercoating, tremclad, SOMETHING with rust protection. If it rusts from the inside of the panel out, it's already a bigass hole when you notice it poking through the paint. Andyfanshawe(sp)'s excellent work on his wagon is a great example of this. He undercoats or powdercoats or somehow coats nearly every piece of metal, and if you don't do that, rust is pretty much a when, not an if.

              Safety:

              Goggles. If you're under a car (especially one as old as a box panther) wear goggles. If you're doing bodywork, wear goggles. If you're around someone welding (but not actively involved) goggles are still a good idea. One stray piece of metal (or even fiberglass or rust) and you might never use that eye again. In some places, that means you might never DRIVE again. So I repeat: goggles. Besides, they make you feel all professional-automotive-technicianey

              If you are sanding anything, ideally even rust, WEAR A MASK. I once went a week without a mask doing bodywork about 1 1/2 hours a day, and at the end of the week it was like I had taken up chainsmoking. It takes a long time for body filler to get out of your lungs, and fiberglass is a REALLY nasty irritant.

              Welding should be done with a welding helmet and gloves, at a bare minimum. Just because granpa smith or the dude down the street with the demo derby car uses the handshield-turnhead tack welding technique DOESN'T mean it's a good idea for your to do it. If you don't believe me, just looks at the hands and forearms of the guy going without the equipment.

              85 4 door 351 Civi Crown Victoria - Summer daily driver, sleeper in the making, and wildly inappropriate autocross machine
              160KMs 600cfm holley, shorty headers, 2.5" catted exhaust, 255/295 tires, cop shocks, cop swaybars, underdrive pulley, 2.73L gears.
              waiting for install: 3.27's, Poly bushings, boxed rear arms, 2500 stall converter, ported e7's, etc

              06 Mazda 3 hatch 2.3L 5AT (winter beater that cost more than my summer car)

              Comment


                #8
                Originally posted by DarkBlueMerc
                I worked for my father when he owned a Colors on Parade franchise. We did mobile body work for dealers on used cars and new cars that were damaged in transport, as well as work for several OTR trucking companies when one of their drivers damaged the fiberglass front end on a truck. We specialized in color matching and blending the repairs on site, all paint was mixed in the van on site as we worked. We did everything from scratches and scuffs to key marks to chips and dings as well as fiberglass bumper repair and plastic "welding" on normal passenger cars. When a drive tire blows on a semi there is usually quite a bit of damage to the surrounding areas, we built that back up with fiberglass cloths, mats, and fillers and resprayed. Additionally, I've done several custom jobs for friends, family members, and myself. I'm currently set up with a turbine and HVLP painting system at home and plan to tackle painting my 84 two door along with making custom fiberglass speaker boxes and heavy fiberglass modification to the dash.
                Not to be rude, but this post is completely useless information-wise. I considered outright deleting it but then no one would know what happened. If you wanted to state your professional background at the beginning of an informative post so be it, but where you work as a sole post doesn't help anyone. This thread has a specific purpose. Helpful information.

                That goes for everyone else too. Before you post in this (or the paint thread) ask yourself if and how it will help others.

                Comment


                  #9
                  Deleted - I misunderstood the rules and purpose of the post. As far as projects I've got planned for my two door they're all in the planning stages. Sorry.
                  Last edited by DarkBlueMerc; 04-06-2010, 01:05 PM.
                  Awesome Electronic Cigarettes
                  Stable: 2008 Toyota Tundra SR5 5.7 4x4
                  1990 Dodge Power Ram W150 4x4
                  1984 Grand Marquis Two Door Lowrider
                  1983 Crown Victoria Two Door

                  Comment


                    #10
                    What tools and items are generally required to do body work? Things I should gather before even thinking about touching my car with sandpaper.
                    sigpic


                    - 1990 Ford LTD Crown Victoria P72 - the street boat - 5.0 liter EFI - Ported HO intake/TB, 90 TC shroud/overflow, Aero airbox/zip tube, Cobra camshaft, 19lb injectors, dual exhaust w/ Magnaflows, Cat/Smog & AC delete, 3G alternator, MOOG chassis parts & KYB cop shocks, 215/70r/15s on 95-97 Merc rims

                    - 2007 Ford Escape XLT - soccer mom lifted station wagon - 3.0 Duratec, auto, rear converter delete w/ Magnaflow dual exhaust

                    - 2008 Mercury Grand Marquis Ultimate Edition - Daily driver - 4.6 2 valve Mod motor, 4R75E, 2.73s. Bone stock

                    Comment


                      #11
                      Tools I used...

                      DA - pneumatic sander
                      Sand paper
                      Sand blast/blaster/blaster nozzle
                      Face sheild
                      Bondo
                      Bondo spreader
                      Windex (used to wet worked areas and check if its flat plus clean up dust)
                      sanding block (can't do it by hand on flat areas)
                      36-400 grit paper varying
                      Sheet metal
                      Rivet gun

                      A more specific explanation of what you are doing specifically would help, and pictures.
                      "Shakedown"- 1991 Grand Marquis GS Dual exhaust, Magnaflow xl turbos, Rear anti sway bar, Outlaw 1 wheels, 43k miles
                      1985 GMC 1500

                      Comment


                        #12
                        Nothing, yet, just gathering information. I will be taking care of small amounts of surface rust in multiple spots. I will have to have someone make me a lower rear quarter panel but I am going to tackle all of the surface rust myself.


                        No pictures since it's just meant as a general question; I have no idea what is involved in doing body work other than what's been posted here.
                        sigpic


                        - 1990 Ford LTD Crown Victoria P72 - the street boat - 5.0 liter EFI - Ported HO intake/TB, 90 TC shroud/overflow, Aero airbox/zip tube, Cobra camshaft, 19lb injectors, dual exhaust w/ Magnaflows, Cat/Smog & AC delete, 3G alternator, MOOG chassis parts & KYB cop shocks, 215/70r/15s on 95-97 Merc rims

                        - 2007 Ford Escape XLT - soccer mom lifted station wagon - 3.0 Duratec, auto, rear converter delete w/ Magnaflow dual exhaust

                        - 2008 Mercury Grand Marquis Ultimate Edition - Daily driver - 4.6 2 valve Mod motor, 4R75E, 2.73s. Bone stock

                        Comment


                          #13
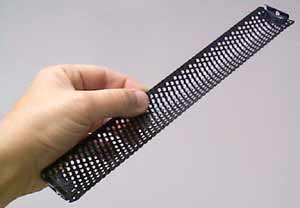
                          I find that a 'cheese grater' can be beneficial at times. I don't know the trade name, so thats what I call it. Its really helpful if you're playing Julius Cheeser and dancing on panels with alot of mud (which is not acceptable, in my opinion). But it can be useful to knock the high spots down when you're just doing a small area as well.


                          I also prefer to use a flexible rubber paddle to apply mud in contoured areas, as opposed to a hard plastic paddle. I can't find a picture of the rubber 3M paddles I have, though.

                          In my opinion, a longboard (as shown below) is also helpful to keep things flat. That and an assortment of blocks.

                          **2012 Ford Mustang Boss 302: 5.0/ 6 spd/ 3.73s, 20K Cruiser
                          **2006 MGM,"Ultimate": 4.6/ 2.73/ Dark Tint, Magnaflows, 19s, 115K Daily Driver
                          **2012 Harley Davidson Wide Glide (FXDWG):103/ Cobra Speedsters/ Cosmetics, 9K Poseur HD Rider
                          **1976 Ford F-150 4WD: 360, 4 spd, 3.50s, factory A/C, 4" lift, Bilsteins, US Indy Mags, 35s Truck Duties

                          Comment


                            #14
                            Originally posted by P72Ford View Post
                            I find that a 'cheese grater' can be beneficial at times. I don't know the trade name, so thats what I call it.
                            It's called a rasp, at least for woodworking...

                            and +1 on the long board, it is much better than a block for the large areas.
                            "Shakedown"- 1991 Grand Marquis GS Dual exhaust, Magnaflow xl turbos, Rear anti sway bar, Outlaw 1 wheels, 43k miles
                            1985 GMC 1500

                            Comment


                              #15
                              Originally posted by P72Ford View Post
                              I find that a 'cheese grater' can be beneficial at times. I don't know the trade name, so thats what I call it. Its really helpful if you're playing Julius Cheeser and dancing on panels with alot of mud (which is not acceptable, in my opinion). But it can be useful to knock the high spots down when you're just doing a small area as well.


                              I also prefer to use a flexible rubber paddle to apply mud in contoured areas, as opposed to a hard plastic paddle. I can't find a picture of the rubber 3M paddles I have, though.

                              In my opinion, a longboard (as shown below) is also helpful to keep things flat. That and an assortment of blocks.

                              The cheese graters are fucking AWESOME on smooth surfaces. They're just as useful on thin bondo. You let the bondo cure, cheese grate down to steel, and then do a skim coat and DA with 180. Very nice!

                              Comment

                              Working...
                              X