
Ok so not that any of you are dumb, but I figured I would make this thread as I have yet to do a tutorial.
This is on how to strip/polish an aluminum intake, not intake specfic.. as long as it is aluminum. It may be easier if it is not a cast intake.. and you will see why in a second.
Step 1. get a spare intake... used whatever.. unless you want your car down for a month, or want to take a week of from your job and kill yourself.
Step 2. procure some good industrial finish remover from an auto parts store.. make sure it is aluminum safe. I used the generic finish remover from advanced auto. Remember to use this outside, with a mask and gloves. It sucks to work with if you are not careful. Spray the intake, (or apply if a gelatin form) and let it sit a little longer than the recommended time. I let it set for 30 minutes. Once this is done you can hose the thing off and if it is a good stripper there will be little to no paint left. Use a putty knife/flat blade screw driver to remove the rest.
Step 3. Sanding, this is where it gets tedious. Do not move on in grit until you are SURE you have gotten everything out besides the scratches the current grit is making. Otherwise you get to start all over, and this is slow as it is.
I have started on this with 36 grit paper using a compressed air powered DA and good old fashioned elbow grease. My goal now is to remove the pits from casting. This is after 4 hours of work.


If you look close you can see what is left to sand with 36 grit. It is very messy and I would recommend doing it outside as well. Plus it is nice weather so I figure I will do it in the sun.
More to come.
This is on how to strip/polish an aluminum intake, not intake specfic.. as long as it is aluminum. It may be easier if it is not a cast intake.. and you will see why in a second.
Step 1. get a spare intake... used whatever.. unless you want your car down for a month, or want to take a week of from your job and kill yourself.
Step 2. procure some good industrial finish remover from an auto parts store.. make sure it is aluminum safe. I used the generic finish remover from advanced auto. Remember to use this outside, with a mask and gloves. It sucks to work with if you are not careful. Spray the intake, (or apply if a gelatin form) and let it sit a little longer than the recommended time. I let it set for 30 minutes. Once this is done you can hose the thing off and if it is a good stripper there will be little to no paint left. Use a putty knife/flat blade screw driver to remove the rest.
Step 3. Sanding, this is where it gets tedious. Do not move on in grit until you are SURE you have gotten everything out besides the scratches the current grit is making. Otherwise you get to start all over, and this is slow as it is.
I have started on this with 36 grit paper using a compressed air powered DA and good old fashioned elbow grease. My goal now is to remove the pits from casting. This is after 4 hours of work.
If you look close you can see what is left to sand with 36 grit. It is very messy and I would recommend doing it outside as well. Plus it is nice weather so I figure I will do it in the sun.
More to come.
 ) - Vicky - 1987 LTD Crown Victoria: 17x8 Gunmetal Gray Coys C-5 wheels, 235/55-17 Falken Ziex ZE-502 tires. 79 LTD Grille, Taillights, and Turn Signals, Blue LED Dash Lights, PI Rear Sway Bar, 140 MPH Speedometer, Dual Exhaust w/ Mustang Headers.
 so much work! They look so nice in the end though.
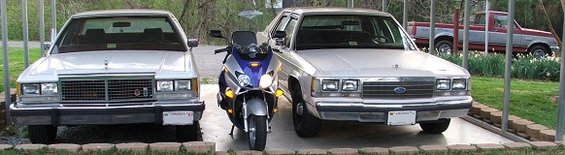


Comment